


 Tweet
Tweet
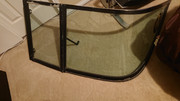
What's up PN! This is my first post on here, and I wanted share my experience with re-powder coating a windshield frame on a 2000 Nautique Super Sport that I picked up a year ago. Like most metal parts, almost 20 years of abuse affected the look of the windshield and it was time to take it apart and get it refinished. For those of you out there contemplating this, I will say it was a very simple disassembly and reassembly if you take the time to prep, get all the right tools, label everything and have patience putting it back together.
This by no means is a step by step guide, its just some helpful tips for those looking to tackle this job on any boat.
Tools I used:
#1 thing I used the most was a spray bottle of dish soap and water!
Phillips screwdriver
Rubber Mallet
Blue Masking Tape
Harbor Freight Plastic Interior Pry Kit
Disassembly:
SOAP AND WATER! After you remove the windshield from the boat, you want to spray soap and water all over all of the rubber gasket and in as many crevices as possible. After letting it sit for about the 30 minutes, the windshield will come apart much easier. Take the it apart by hand, being careful not to tweak, twist or flex the glass. It will crack. Keep the glass on the top or bottom edge of the windshield to make sure minimize this. Try not to lay it on the flat surface of the glass, it doesn't take much for it to crack.
LABEL! Label every metal piece and every rubber gasket. Port/Starboard Door/Top/Bottom/Edge. This will make assembly so much easier.
Powder Coating:
This part is simple, pick the color you want I wanted a semi-gloss for an OEM look. I bought 5lbs in the color because I will be powder coating my tower after the season to match the windshield. Of the 5 lbs, it only took half a pound to do the windshield.
IMPORTANT! Make sure to tell your powder coating shop to keep the powder coating in all channels to a minimum coverage. This will make it assembly so much easier!
Re-Assembly:
Clean Everything! Soak the rubber window channel gaskets in soap and warm water, scrub with a brush/toothbrush, rinse and let it dry out. 20 years of abuse, the gasket on my windshield was still in perfect condition after cleaning. If you're in salt water or if your boat sits outside, you may want to replace it.
Clean the glass before you start assembly. Use a razor blade and Windex to clean the buildup of dirt, hard water stains and grime that accumulates on the glass at the window channel gaskets. You can also use this time to do the whole windshield and them wax if you want.
Now that you have the glass all clean and shiny, you're going to mess it up again by spraying soap and water all over for re-assembly. This made a it so much easier, because you will be putting on and taking off the frame to get the screws aligned. Starting with the bottom piece, then the top then the sides worked best for me. The rubber mallet was only used for a couple of light persuasive taps to get the screw holes to align. DO NOT USE A HAMMER!
Install:
You will need to purchase new rubber gasket that goes between the windshield frame and the gelcoat. This is an adhesive tape and keeps it water tight. Prior to installing the windshield back on the boat, clean and wax the gelcoat since you have easy access to all of the dash. Re-install the door, prior to installing the windshield back on the boat, or you will have to take it back off.
When installing the screws to attach the windshield to the boat, put painters tape on the frame to protect it. I can guarantee you will scratch the powder coat if as the screwdriver hits the frame. I even put a bunch of tape around the screwdriver for added protection.
Lastly, if you have the older foam trim that covers the screws, go ahead and spend the extra money and order the updated screw cover from Nautique Parts. Looks so much better.
At the end of the day, all the prep and patience made everything so much easier. I know I left out a bunch of details, and if anyone has questions feel free to ask.
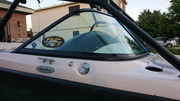
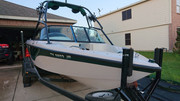
Here are some simple shots of before and after. It makes a huge difference on how the boat look. Plus a shot of my 75th Anniversary Super Sport.
This by no means is a step by step guide, its just some helpful tips for those looking to tackle this job on any boat.
Tools I used:
#1 thing I used the most was a spray bottle of dish soap and water!
Phillips screwdriver
Rubber Mallet
Blue Masking Tape
Harbor Freight Plastic Interior Pry Kit
Disassembly:
SOAP AND WATER! After you remove the windshield from the boat, you want to spray soap and water all over all of the rubber gasket and in as many crevices as possible. After letting it sit for about the 30 minutes, the windshield will come apart much easier. Take the it apart by hand, being careful not to tweak, twist or flex the glass. It will crack. Keep the glass on the top or bottom edge of the windshield to make sure minimize this. Try not to lay it on the flat surface of the glass, it doesn't take much for it to crack.
LABEL! Label every metal piece and every rubber gasket. Port/Starboard Door/Top/Bottom/Edge. This will make assembly so much easier.
Powder Coating:
This part is simple, pick the color you want I wanted a semi-gloss for an OEM look. I bought 5lbs in the color because I will be powder coating my tower after the season to match the windshield. Of the 5 lbs, it only took half a pound to do the windshield.
IMPORTANT! Make sure to tell your powder coating shop to keep the powder coating in all channels to a minimum coverage. This will make it assembly so much easier!
Re-Assembly:
Clean Everything! Soak the rubber window channel gaskets in soap and warm water, scrub with a brush/toothbrush, rinse and let it dry out. 20 years of abuse, the gasket on my windshield was still in perfect condition after cleaning. If you're in salt water or if your boat sits outside, you may want to replace it.
Clean the glass before you start assembly. Use a razor blade and Windex to clean the buildup of dirt, hard water stains and grime that accumulates on the glass at the window channel gaskets. You can also use this time to do the whole windshield and them wax if you want.
Now that you have the glass all clean and shiny, you're going to mess it up again by spraying soap and water all over for re-assembly. This made a it so much easier, because you will be putting on and taking off the frame to get the screws aligned. Starting with the bottom piece, then the top then the sides worked best for me. The rubber mallet was only used for a couple of light persuasive taps to get the screw holes to align. DO NOT USE A HAMMER!
Install:
You will need to purchase new rubber gasket that goes between the windshield frame and the gelcoat. This is an adhesive tape and keeps it water tight. Prior to installing the windshield back on the boat, clean and wax the gelcoat since you have easy access to all of the dash. Re-install the door, prior to installing the windshield back on the boat, or you will have to take it back off.
When installing the screws to attach the windshield to the boat, put painters tape on the frame to protect it. I can guarantee you will scratch the powder coat if as the screwdriver hits the frame. I even put a bunch of tape around the screwdriver for added protection.
Lastly, if you have the older foam trim that covers the screws, go ahead and spend the extra money and order the updated screw cover from Nautique Parts. Looks so much better.
At the end of the day, all the prep and patience made everything so much easier. I know I left out a bunch of details, and if anyone has questions feel free to ask.
Here are some simple shots of before and after. It makes a huge difference on how the boat look. Plus a shot of my 75th Anniversary Super Sport.


Comment